For all of its wonderful qualities, denim was a pain in the ass to work with.
Now some of those problems arise from the very wonderful qualities I mentioned. Trying to cut through 2 pairs of pants at one time is frustration looking for a place to happen. From the 4 layers of denim to the factory produced seams, cutting denim is a huge pain. But that’s why everybody wears it in the first place. It’s tough and lasts forever. On top of that is the fact that it’s a pain to sew as well. You need to change sewing machine settings and needles. Thread size, foot tension and stitch length. Everything changes in order to keep from overwhelming your Not Factory sewing machine.
One thing that caught me by surprise about working with denim; how quickly it unravels. You can’t cut it and then wait a day or two before sewing. It’s like I created some kind of temporal anomaly when I cut the pants. They quickly started regressing to thread. If I waited a day or two they could have been cotton plants. Make sure you’re ready to start sewing before you put scissors to denim. I was lucky in that I happened to be ready to start sewing when I made my cuts.
I was surprised at how quickly denim started to fray but not some of the other fabrics that I purchased. Many of them are thinner and lighter and more susceptible to the rough handling you’re going to give them while sewing. Making sure you’re ready will help minimize the damage through out the process.
For those that want to make your own costumes instead of modifying what you purchase at Goodwill you could try looking at JoAnn’s Fabrics. Be warned though, she’s a bit clingy.
Part of my start up costs included all the incidentals for running my sewing machine and creating other items I might need. Extra needles, thread, patterns, etc. None of which should come as a surprise. If you get started in this hobby thinking you can get things done with just the manufacturer included items then you more help than this blog can give you. Some of these “incidentals” hardly have an incidental cost. The self healing cutting mat ran about $40 and I needed to buy a second to cover the entire card table I use for measuring my fabrics. Of course you’re certainly welcome to run your blades over your table and mar the shit out of it but why not do things right?
As I have already mentioned, I wanted to cut costs but clearly wasn’t very good at it. One thing I did do to keep costs down as much as possible was to sign up for JoAnn’s mailing list. They mail you coupons about2 or 3 times every hour it seems. Most of which, you’ll want to keep around. You’ll frequently get 40% off of a regular priced item, that includes a single cut of fabric, and 25% your entire purchase. The fun of this is that these coupons stack. Remember, you get plenty of them. Check the dates because they will send some out well before they are active. Also check the bar codes to make sure you’re not trying to use the same one multiple times, and I have yet to see any of them repeat. While the 40% or 50% off coupons will not work for sale items, the 25% off coupons do. As I said, they stack also. If you’ve got five 40% off coupons and a 25% off total purchase coupon, you can use them all. An added bonus is that the coupons will automatically discount the highest priced item it can. Just about anywhere else you go the exact opposite is true. How cool is that? I’ve walked in and purchased $110 worth of items and fabric and paid only $65. Not too shabby.
Why is this important? Now the following may not apply to everybody. But sewing is addictive! The more that I do the more that I want to do. And all of it is practice. Where I first started out doing something simple to become familiar with the machine I have now gotten to the point that I can make some pretty decent clothing pretty quickly. I muddled through a quick and dirty swag bag and then progressed to some novelty vests. The first two vests took about 4 days to complete. The second two vests took 1 day. On top of that, the second set I modified the designs so that they are reversible. My first swag bag was basic to the point of laughable, the second two were badass creations of my own doing! I took an idea and ran with it. No patterns, just a concept and some quick references. Needless to say this has fueled my desire to sew and that has fueled more fabric purchases than I would care to admit.
As I’ve said before, PRACTICE! These are the tools of your new trade, or hobby at least. Get some time behind the wheel and make sure you’re comfortable with it. Yeah, I still have a lot to learn but I never expected to have everything down in the first couple of months.
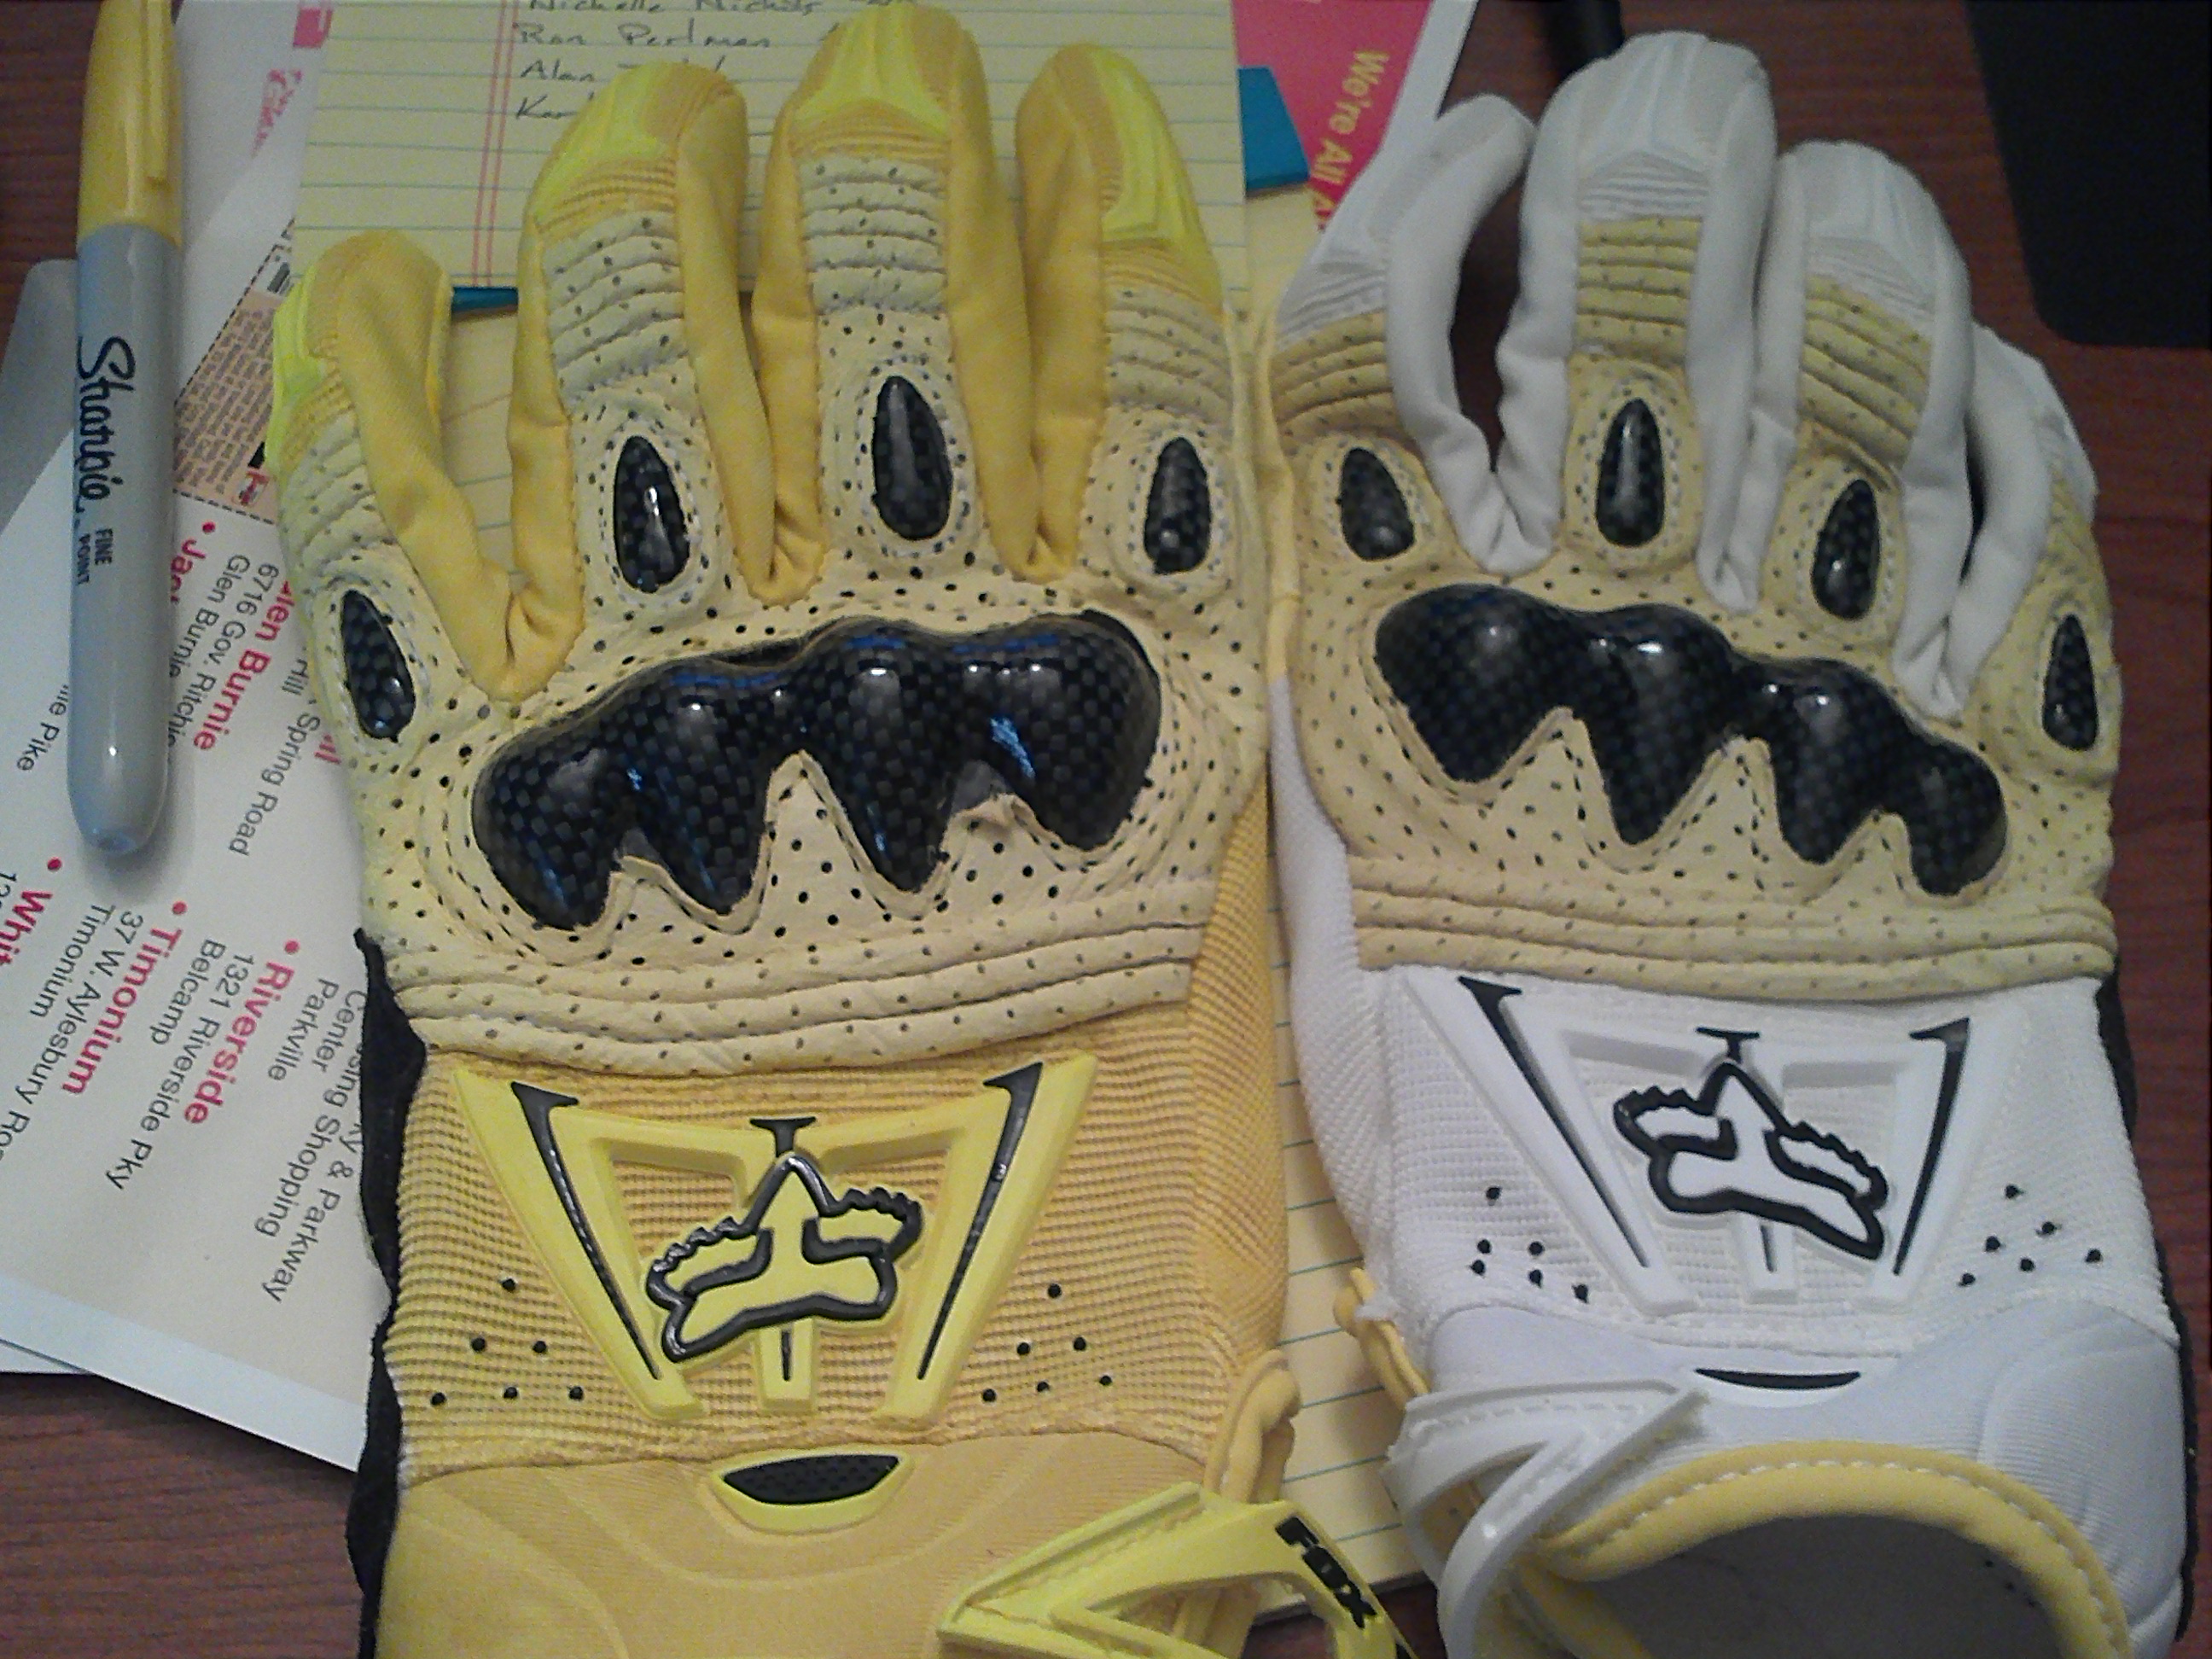
My cosplay character wears gloves most of the time as a precaution and protection for those around her. Since I don’t want to make or wear long silk gloves I had to think of something else. Going with a more masculine take on the character I wanted gloves that had more of a tactical/military feel to them. The chances of finding them in yellow, naturally, was slim to none. Thinking along the same lines as the pants, I looked for gloves that were white and I could change the color scheme.
What I found were Fox sport glove knock-offs. For those that don’t know, many products produced in China will come from factories that operate on 12-16 hour days. At the end of the day the factory stops producing the name brand and the workers go home. Then a new shift of workers come in and begin manufacturing basically the same product with only slightly different materials. The gloves I purchased were described as a military tactical motorcycle gloves and priced at about $12. The Fox symbol is clearly visible but never mentioned in the listing. When received the gloves have the Fox symbol AND the Fox trade name on the Velcro clasp. My biggest concern was the fact that I purchased the gloves from a Chinese seller. If they took my money and didn’t provide the product my savings go from 75% to 0 in a heartbeat.
Once I received the gloves the next hurdle required a little research. Since the gloves contain a number of different materials in the construction, getting the coloring right was going to be tricky. There’s neoprene, leather, artificial leather, and plastic. I knew the hardest would be the neoprene and the most difficult would be the leather. Let me clarify. Neoprene is designed to be resistant to chemicals and liquids. This means getting it to accept some type of chemical solution to change its color would be insanely hard. It’s just designed to prevent that. Meanwhile leather requires chemicals to remove protective coatings, chemicals to change the color and then more chemicals to protect the new color. All administered by hand. While it may not be particularly hard work, it’s still work.
The first thing I did was use a deglazing solution to remove the protectant coating on the leather. If I had it to do over I would not have bothered. The fumes where incredibly overwhelming. In the short time that I had the bottle open and was applying it to the leather I became light headed. And I only deglazed the leather on the back of the gloves. The leather/suede palms were untouched. The fumes were so strong that I did a pretty half assed job of deglazing the second glove. I was more concerned with getting the bottle closed and the air cleared before I wound up drooling on the floor.
This is where the wishful thinking comes in. After the deglazing I threw the gloves into the pot with my pants and shirt to be dyed yellow. I didn’t have a lot of hope for this because of the materials but I figured I had a second pair available so I could experiment on this on. The only part of the gloves that accepted the color was the leather. The palms and the back of the gloves came out an acceptable yellow. The stitching, ironically, remained white. The remainder of the gloves remained white. I had hoped the nylon type webbing would have accepted the color as well.
With a large percentage of the gloves left to turn yellow I turned to the internet for ideas. After several google searches I could only find one real suggestion for changing the color of neoprene. Sharpies. Yeah, sharpies. Most of these sharpie suggestions also came from diving sites. Since divers tend to wear neoprene diving suits I was reluctant but willing to defer to their greater knowledge of the material. So after several drinks one night I grabbed my yellow sharpie and started coloring.
“Dying” process
I was extremely happy with the results. While not perfect I am more than satisfied with the finished product. The yellow of the sharpie and the dye are different hues but I don’t think this is an issue. The webbing, when worn, shows some uneven coloring. There are areas of darker ink saturation and other areas that appear lighter because of lower ink saturation. The rubber and the neoprene colored extremely well. Those divers seem to know what they’re talking about.
As I mentioned before, if I had it to do over I would not bother with deglazing and dying the leather. Given how well the sharpie worked I might think about leaving the leather white or coloring it with the sharpie as well. I am concerned with streaking the leather in this manner.
I am beginning to think that Sharpies are a cosplayers best friend. Using them on the gloves, while the most extensive, is certainly not the last time I used their color changing capabilities. While sewing a patch onto a jacket I used a thread that only matched part of the patch. As I was sewing by hand this was hardly a perfect job. Once I finished I used a sharpie to color the thread to match the corresponding area. Making the work less visible and the costume more aesthetically pleasing. I can see them being used to touch up colors in other fabrics, leathers and latex where normal wear creates scuffing or chipping. Given the price I think purchasing a set with a variety of colors would be useful to anybody starting out.
At this point the most frustrating and expensive part of this costume has been dying the clothes. The design that I have in mind only requires two colors for the shirt and the same for the pants. Seems pretty straight forward, right?
BUT, because I am taking two shirts and two pairs of pants, cutting them up and sewing them together to make one pair it is not as easy as it could have been. I actually want it to look like two pairs of pants sewn together. The intention is for it to look like I made the costume from scratch after discovering my powers. Sort of an origin type costume. I want the color scheme and overall appearance to immediately signify the character I am portraying but be unique enough that it is my own creation. Oh, and because it is a gender swap I also want it to be masculine.
As I mentioned previously, the process of bleaching pants to prepare them for dying requires some skill. Rather than develop that skill I went another route. I ordered white pants that I could dye. Pretty clever if I do say so myself. And it would have been if I had enough skill. Unfortunately there is a significant amount of technique that comes into play when dying clothes. Not to mention salt. Lots and lots of salt.
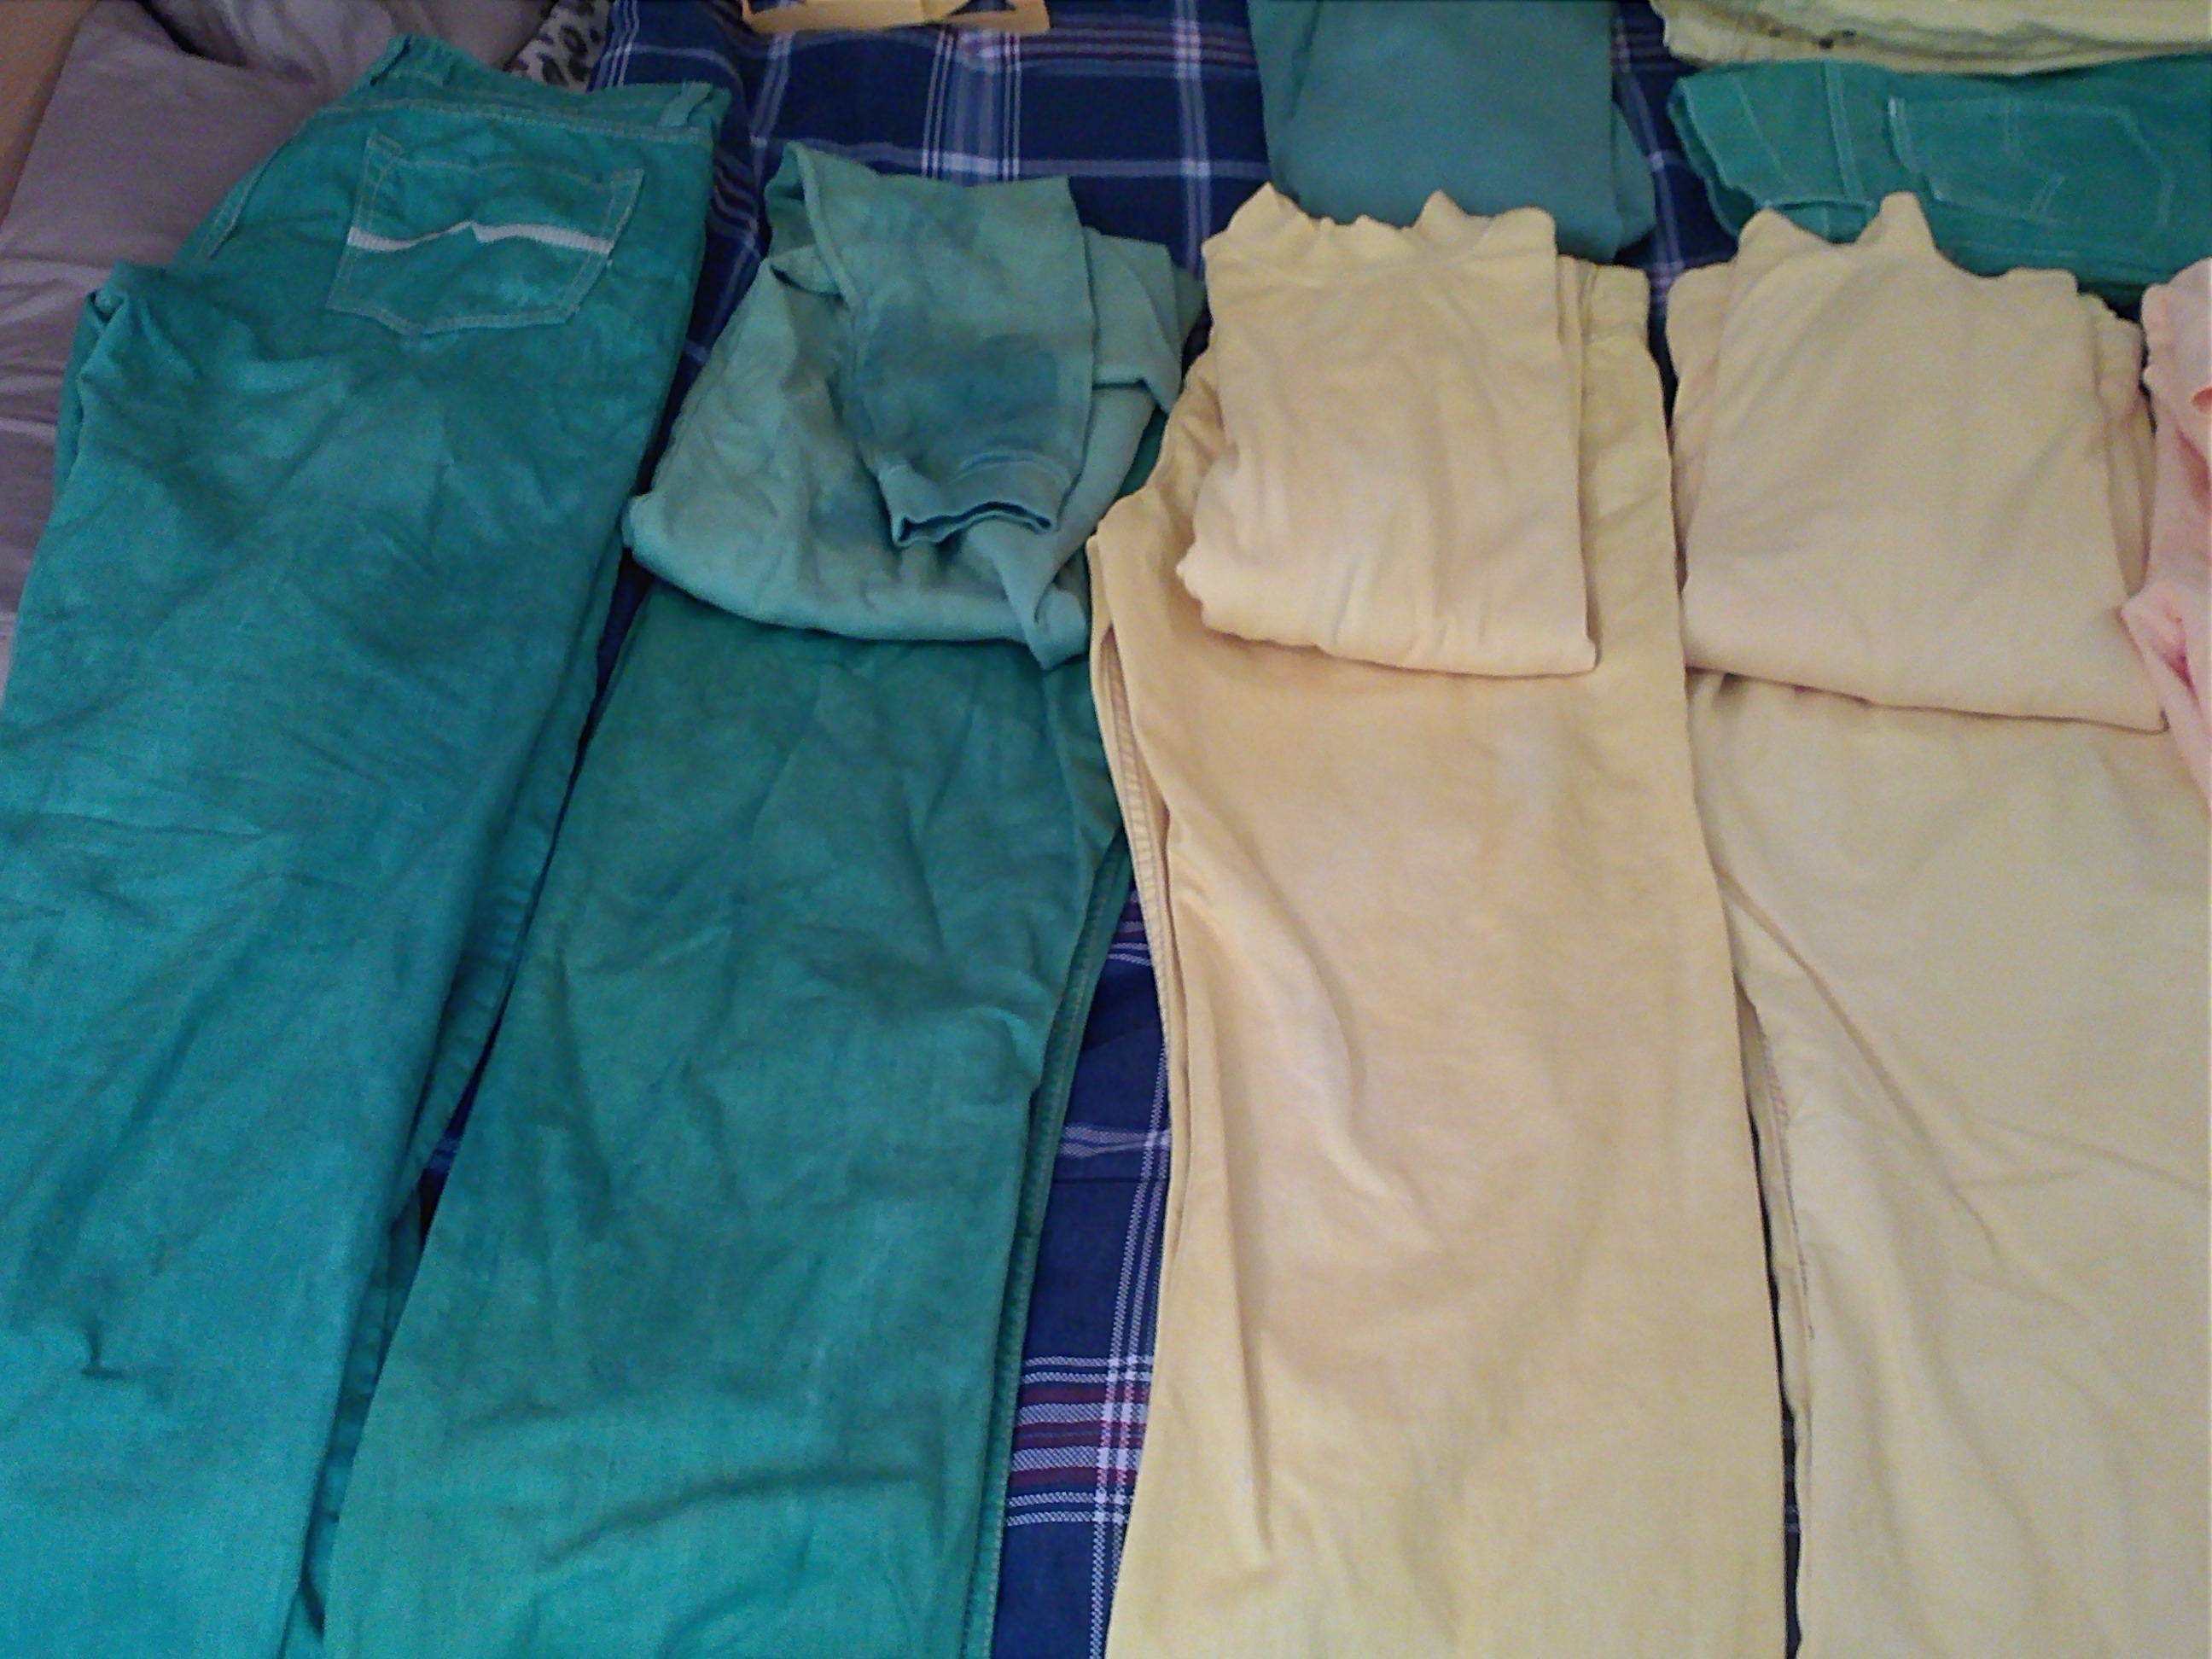
There are a number of different brands of clothes dye available on the market as well as forms. Rit, one of the more common brands, produces dyes in powder and liquid forms. On top of all this there is a variety of ways to USE the dyes. Instructions written inside the Rit box detail a Bucket, Stove top, and 2 Washing machine methods. Most, if not all, can be used with the Rit liquid dyes. During my learning process I used both the powdered and liquid Rit formulas and the Dylon powder. I also used 4 different brands of pants. Remember, this required two pairs of pants, one of each color. Now I think you’re beginning to see how this can get expensive.
Let’s begin.
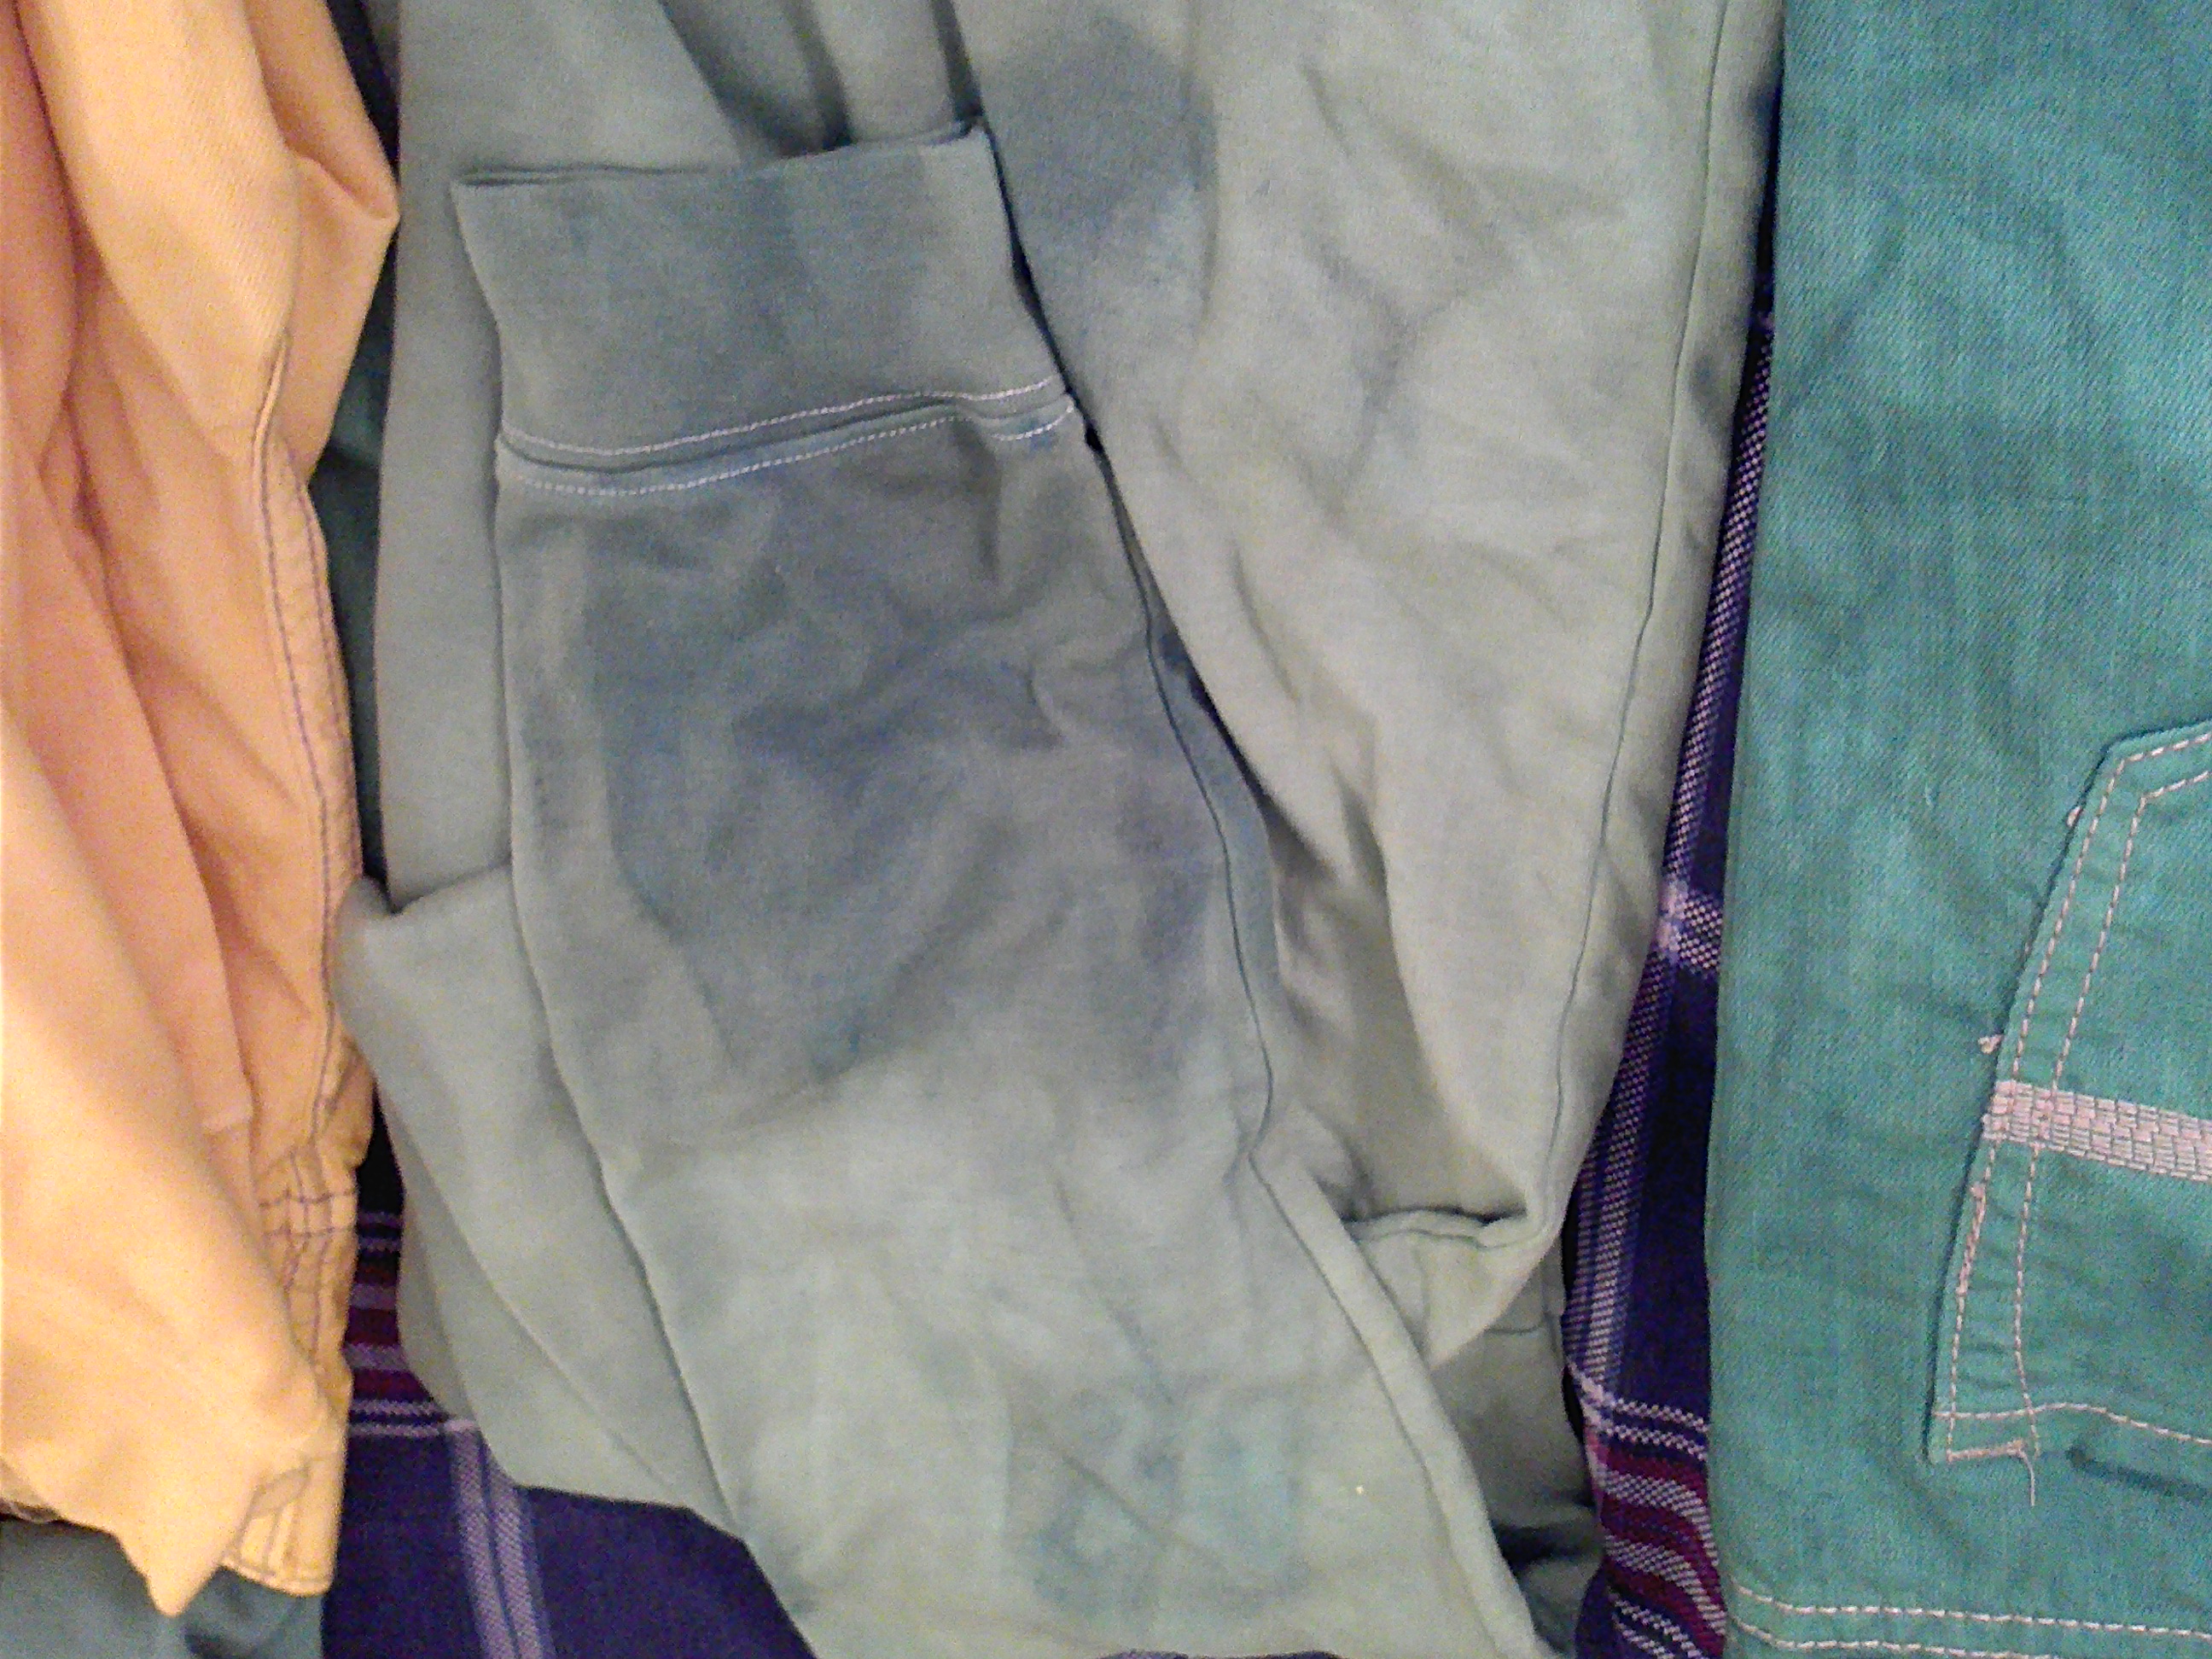
My first attempts began with the Rit powdered dye. The directions indicate using one dye packet per pound of clothing or 1 yard of fabric. I wanted to ensure that the color of the pants exactly matched the color of the shirt so I decided to dye the pants and shirt together to get the hues correct. Unfortunately this did not go as I had hoped. First tip, make sure the dye is completely dissolved in the water. All of the powder will eventually dissolve given enough time, and since the directions call of 30 minutes, there is plenty of time. If, however, there is still some powder at the bottom of the water, it can discolor the fabric.
Fabric that is discolored.
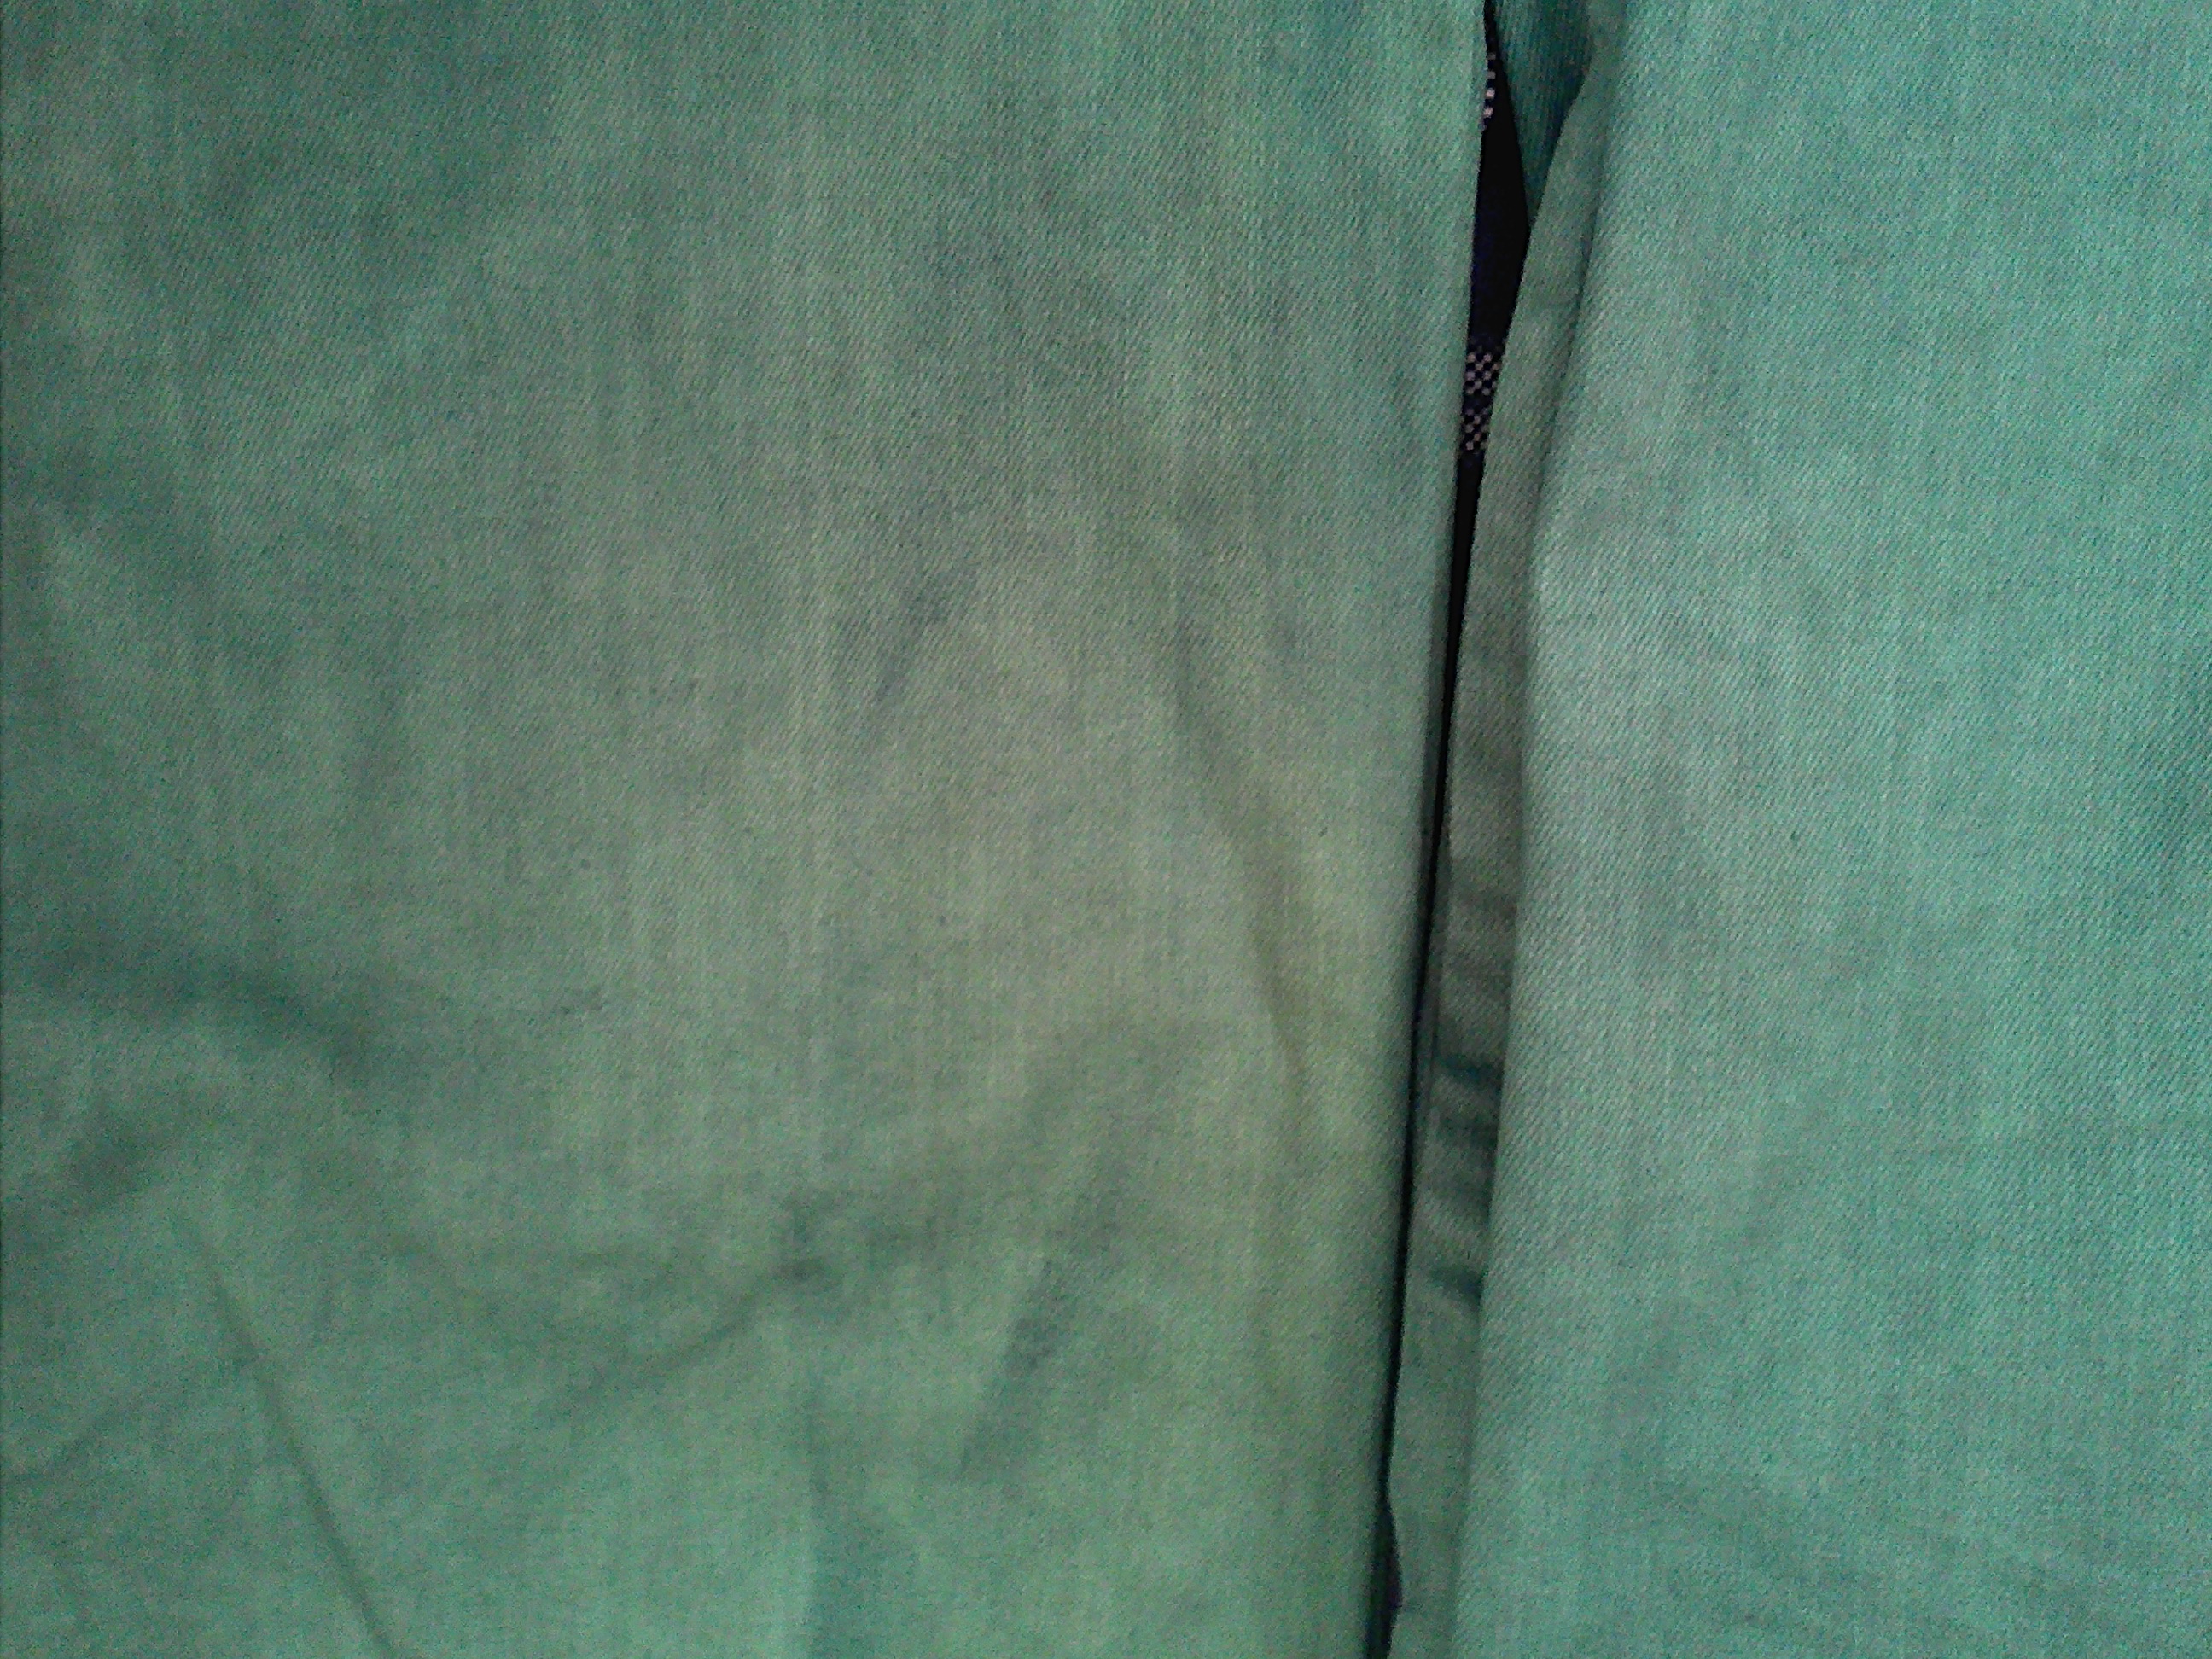
Just to add an extra twist to everything, this is not the only way your fabric can be discolored. If the fabric folds or bunches up it can prevent the dye from evenly saturating the fabric. This leads to light spots instead of dark.
Light spots
While on the yellow pants this is all but unnoticeable, in the darker colors this becomes a glaring problem. BUT WAIT, there’s more. With the first attempts I used the powder. My second attempt I used the liquid. Couple that with the stove top method and I got a slightly different hue. I cannot say if it was the liquid dye or the continuous application of heat that made the difference. Even so, my technique was still shit and I still had mottling and light spots on the pants.
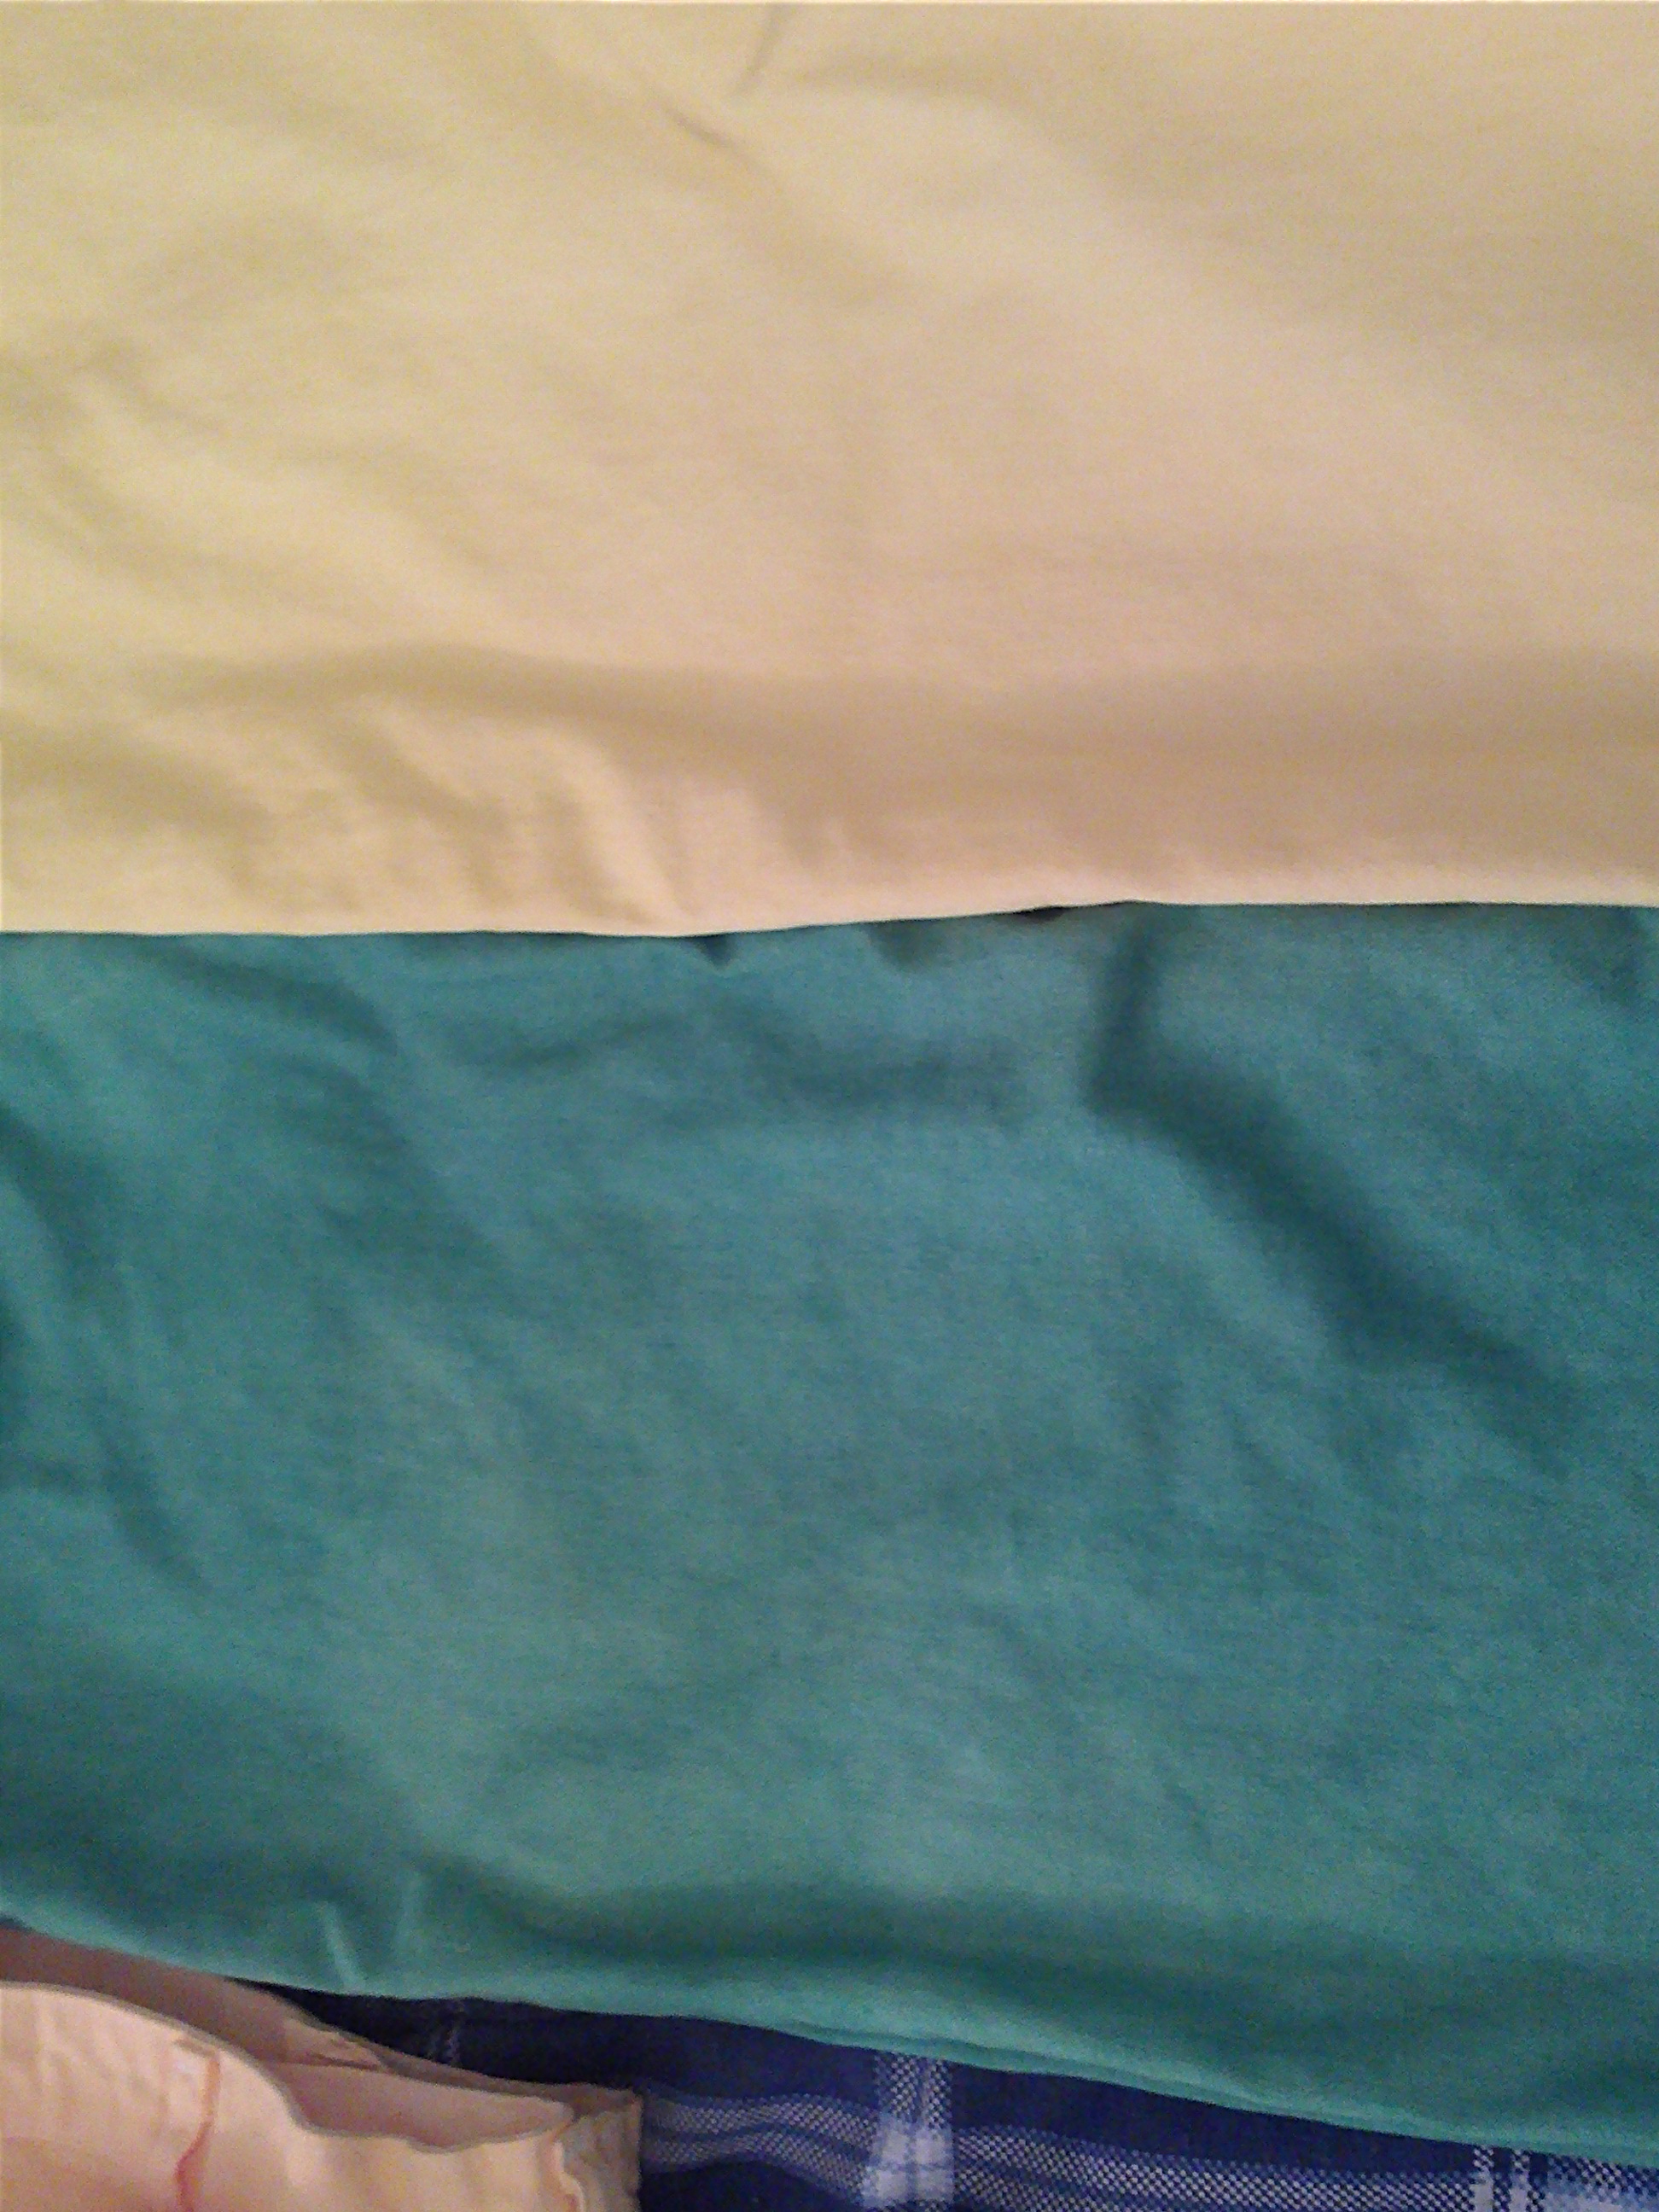
My attempt used new dyes and new brands of pants. The Dylon dye did not give me a dark enough color for either the yellow or green.
Just the two on the left.
While the color was even, it simply was not dark enough for my purposes. Given my luck so far I didn’t think trying to redye the clothes was going to be worthwhile.
My 4th attempt is on the right in the picture above. I returned to both the Rit powder and the bucket method. Shit went absolutely perfectly. I got a great color and an even distribution of color throughout. Even so, the pants are worthless. I chose some cheap pants to keep costs down and I ended up with cheap pants. The washing process and time spent in the hot dye shrank the pants to the point where they no longer fit. Go figure.
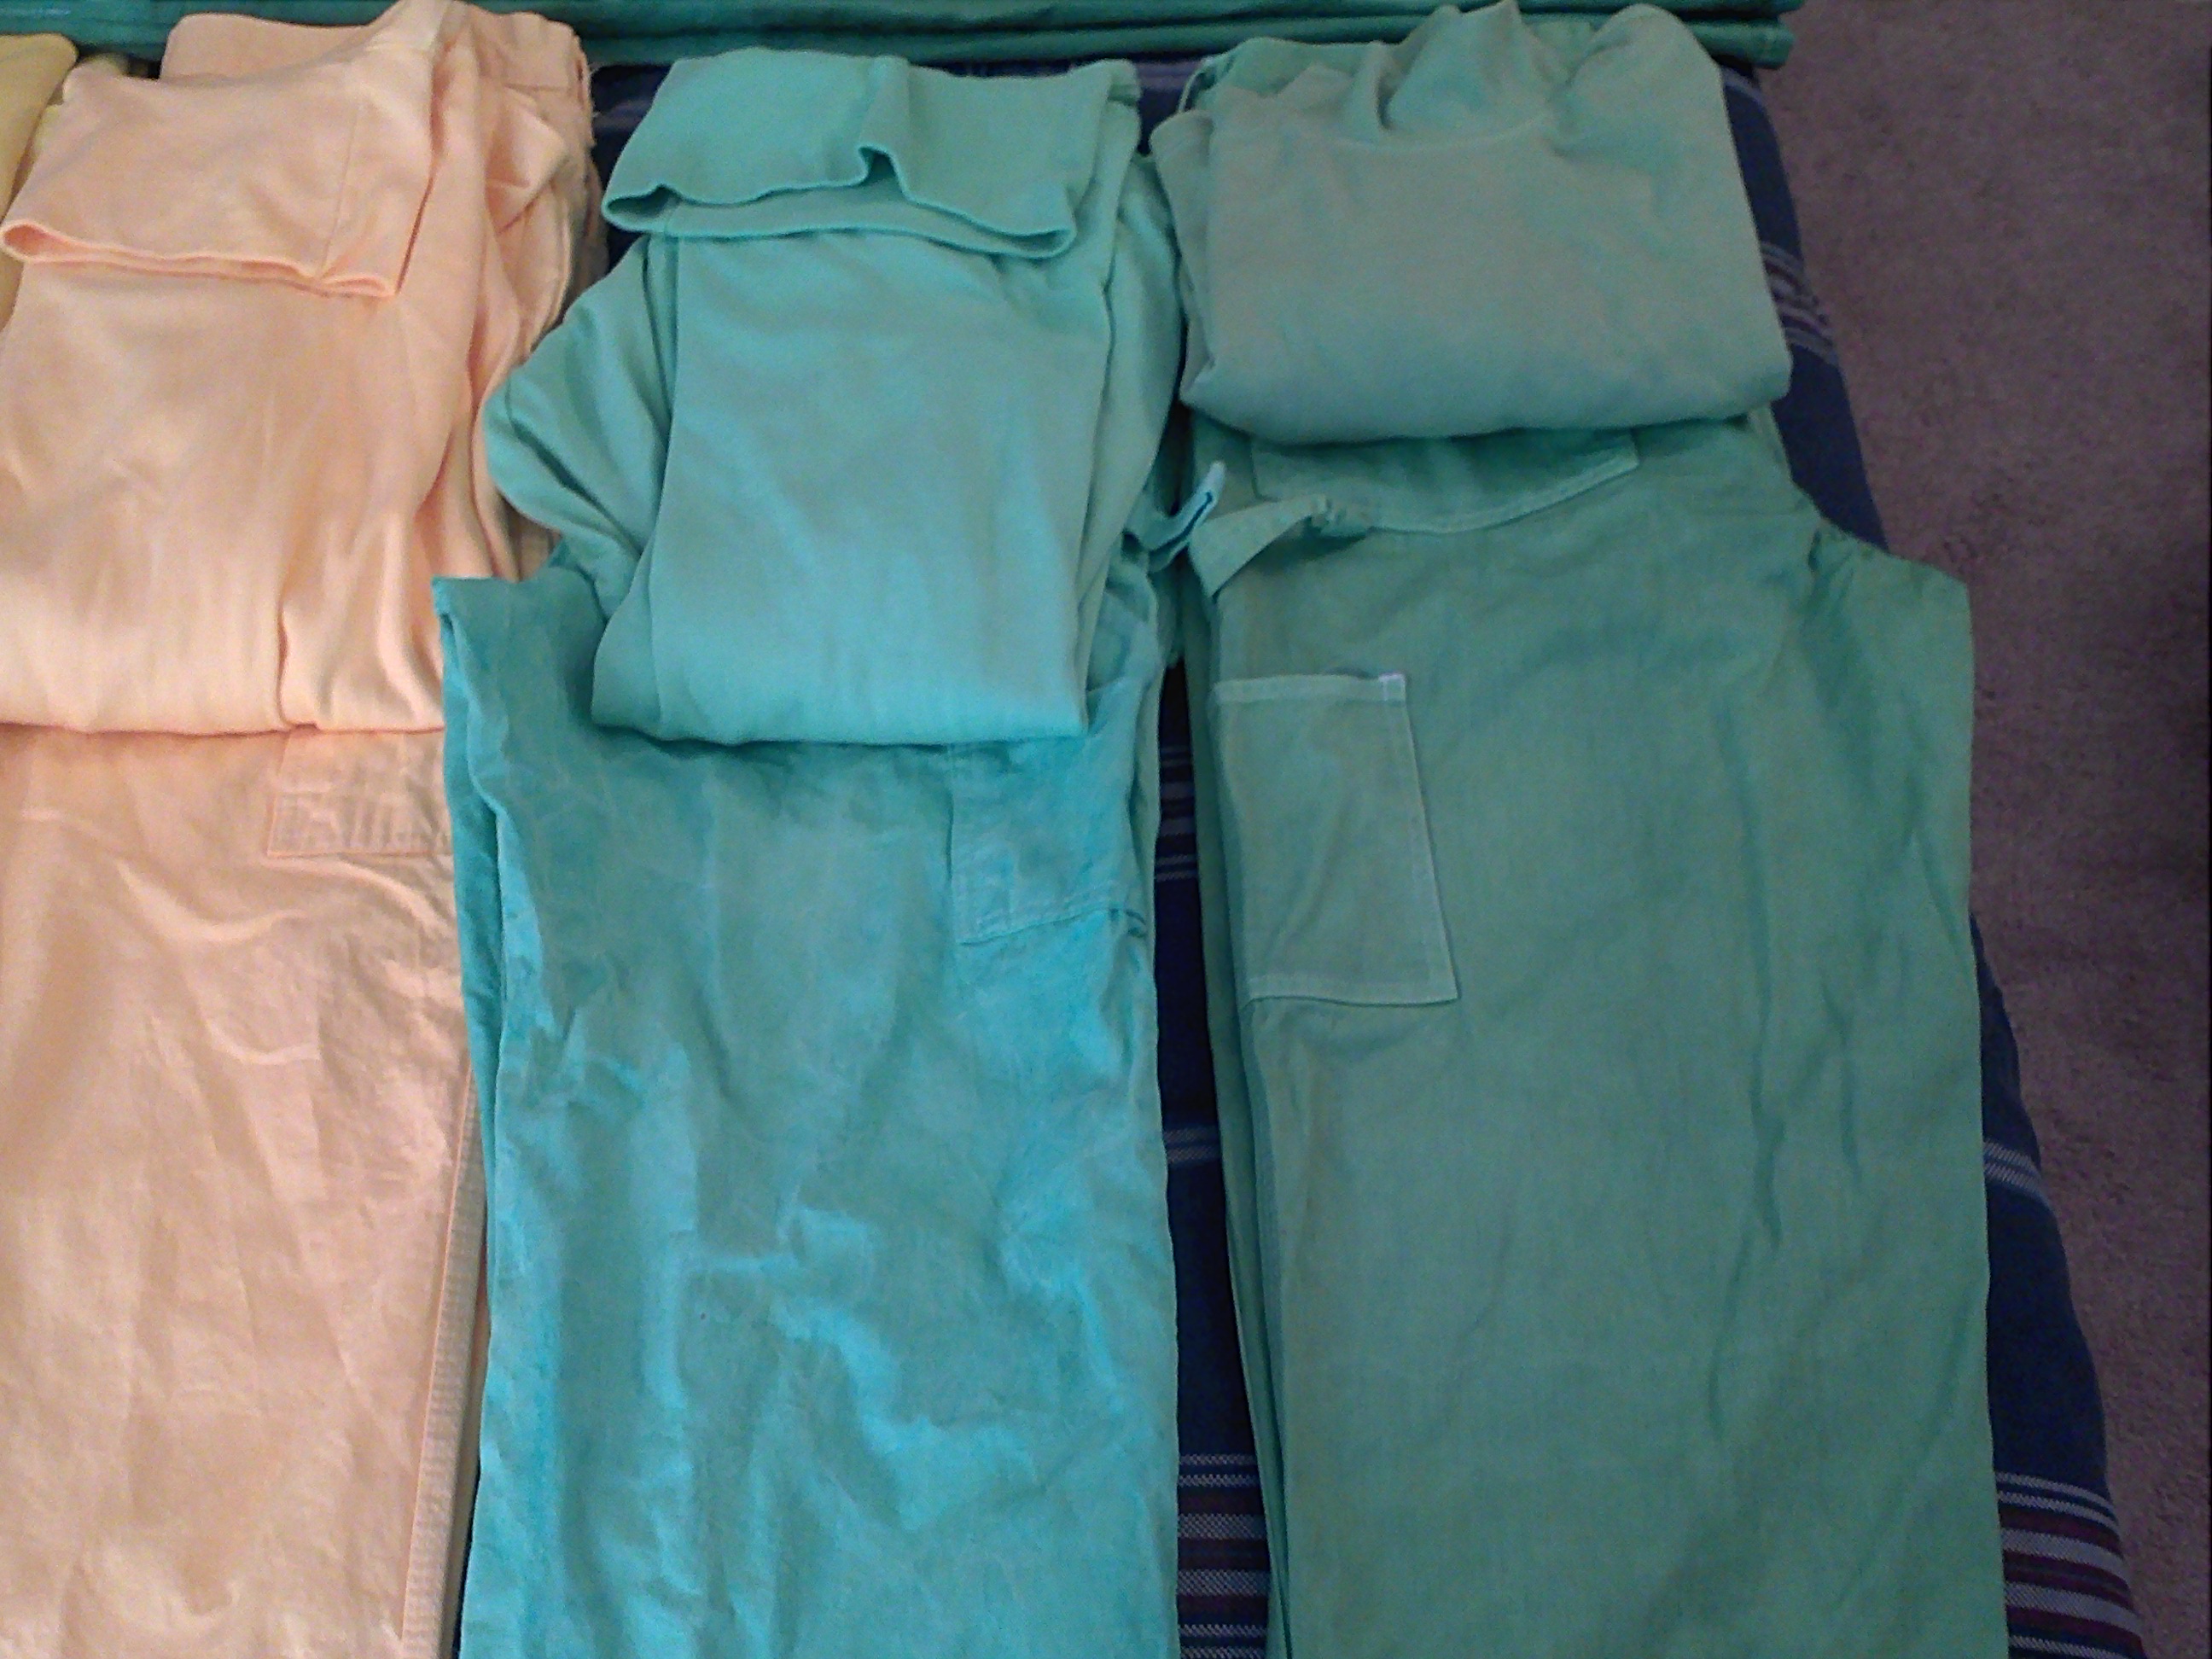
I ordered yet another set of pants to try again. This time, great results.
Finally!
There is some lightness in areas for the green pants but nothing to the point where I would discard them.
Now the part you’ve anxiously been waiting for; the actual techniques and tips that I used.
When googling the subject you’ll get some sound advice like washing the fabric without soap. This gets out any residual chemicals or detergents that could hamper the uptake of the color. Additionally, you want to use quality fabrics or brands. See that whole thing about shrinking clothes above.
This process is all about getting dye INTO your clothes. Unfortunately it will also get dye into everything else as well. This is an incredibly messy chore and you will want to take precautions as you see fit. Towels on the floors, plastic bags on the counters, borrowing that serial killers basement space. Additionally, I suggest you wear something you don’t mind changing the color of in limited areas. Because this is done in water, there will be some splashing and that means other shit is going to get wet. Reconcile yourself with that before you wear your designer pants and shirt for this.
I started with the “stove top” method and switched to the bucket method part way through. The instructions call of the addition of salt or vinegar depending upon what type of fabric you are dying. Since I was just doing cotton I got to add salt. A CUP of salt. That’s a lot of fucking salt. On the stove I added 2 gallons of water to a large pot and applied heat to dissolve the salt into solution. The directions call for up to 3 gallons of water. The extra gallon could be useful in speeding up the dissolving of the salt and dye. It would also keep the clothes from bunching up, this means a more even color. Of course that is also another gallon of dye water splashing all over the fucking place.
Once the dye and salt were completely dissolved I turned off the burner and moved the pot to the floor, which I had covered with towels. This prevents coloring the floor or burning holes in it. Either one I consider “bad”. The directions tell you to get the clothes wet first to aid in the saturation. When putting the clothes in the water I “rinsed” them. Put them in and make sure the were submerged and then lifted them out and put them back in several times. Make sure that you open up the clothes as well. When you wet them down and then submerge them the fabric and stick together just like wet clothing sticks to skin. This will prevent even saturation of the material. Open the clothes so the water can get inside and out. After “rinsing” a couple of times submerge the clothes and try to push out as much of the air as possible. This will help keep as much of the fabric as possible beneath the surface of the water. Periodically, every 5-10 minutes, perform this rinsing again. I did not follow the 30 minutes explicitly but after 3 or 4 rinses I removed the clothes.
Per the directions I washed and dried the clothes. Naturally, you don’t want to mix the dyes in the washer so wash each color separately. This is not too hard as you’ll probably be dying the second color while the first is in the washer.
Making sure the dye is fully dissolved and “rinsing” the clothes were key in making sure that the color fully saturated the pants and prevented additional swearing and expenses. The method you choose, obviously, will determine how you apply these tips. If you use a washing machine I doubt you’ll need to remove it from the stove top.